|
| Holiday Sale! 20% off all patterns! |
|
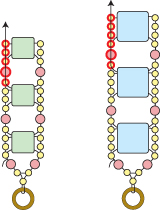
TILE BEAD STACKER (©2017 Deborah Roberti)
Use 5mm by 5mm Miyuki Tila beads or Tile Mini beads, or full-sized 6mm by 6mm Czechmates (or other brands) tile beads, to create these fun and easy stacker bracelets. Triple the length and make some awesome wrap bracelets. MATERIALS
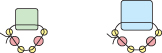
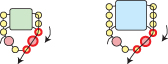
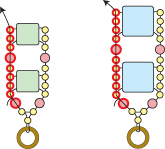
NOTE: Illustrations for steps using Miyuki Tila beads and Tile Mini beads (which measure 5mm by 5mm) are on the left and Czechmates (or other brands) tile beads (which measure 6mm by 6mm) are on the right for all steps to accommodate the difference in size between these two-hole tile beads. Step 1: Thread your needle with about 2.5 yards of FireLine. Leaving about a 6-inch tail that you can weave in and make disappear at any time, string a seed bead and go through the bottom hole of a two-hole tile bead. String a seed bead, a 3mm bead, two seed beads and a 3mm bead. Tie the beads together in a circle with a tight double knot:
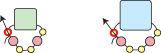
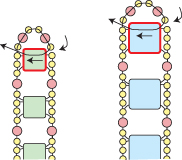
Step 2: Go back up through the seed bead highlighted in RED:
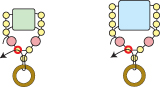
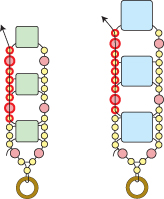
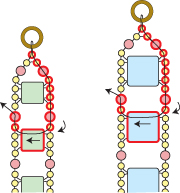
Step 3: String two or three seed beads (how many depends on the size of the two-hole tile bead that you are using). Go across through the top hole of the two-hole tile bead that you strung in the first step. (highlighted in RED):
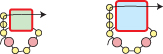
Step 4: String two or three seed beads (how many depends on the size of the two-hole tile bead that you are using). Go down through the seed bead, the 3mm bead and the seed bead highlighted in RED:
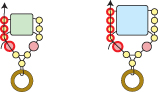
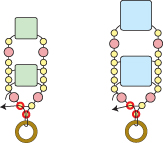
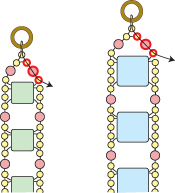
Step 5: String a seed bead. Go through your clasp and then back up through the seed bead that you just strung. Continue up through the seed bead highlighted in RED:
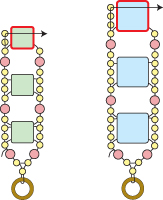
Step 6: Go back up through the 3mm bead and the seed beads highlighted in RED:
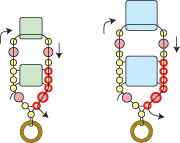
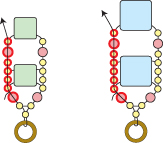
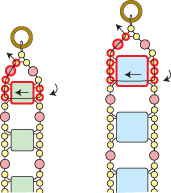
Step 7: String a seed bead, a 3mm bead and a seed bead. Go across through the bottom hole of a new two-hole tile bead. String a seed bead, a 3mm bead and a seed bead. Go around and down through the beads highlighted in RED:
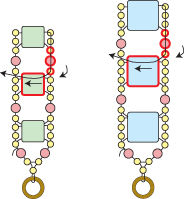
Step 8: To reinforce your attachment to the clasp, go down through the seed bead highlighted in RED, around through your clasp, back up through the seed bead that you just exited and continue up through the seed bead above (highlighted in RED):
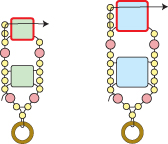
Step 9: Go back up through the beads highlighted in RED:
Step 10: String two or three seed beads (how many depends on the size of the two-hole tile bead that you are using). Go across through the top hole of the two-hole tile bead that you strung in Step 7 (highlighted in RED):
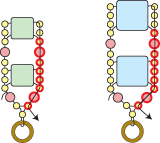
Step 11: String two or three seed beads (how many depends on the size of the two-hole tile bead that you are using). Go down through the beads highlighted in RED:
Step 12: To reinforce your attachment to the clasp once more, go down through the seed bead highlighted in RED, around through your clasp, back up through the seed bead that you just exited and continue up through the seed bead above (highlighted in RED):
Step 13: Go back up through the beads highlighted in RED:
Step 14: String a seed bead, a 3mm bead and a seed bead. Go across through the bottom hole of a new two-hole tile bead. String a seed bead, a 3mm bead and a seed bead. Go around and down through the seed beads and 3mm bead along the right side of the two-hole tile bead below and then go across through the top hole of the next two-hole tile bead below (highlighted in RED):
Step 15: Go back up through the beads highlighted in RED:
Step 16: String two or three seed beads (how many depends on the size of the two-hole tile bead that you are using). Go across through the top hole of the two-hole tile bead that you strung earlier (highlighted in RED):
Step 17: String two or three seed beads (how many depends on the size of the two-hole tile bead that you are using). Go down through the seed bead, the 3mm bead and the seed highlighted in RED and continue across through the top hole of the two-hole bead below (highlighted in RED):
Step 18: Go back up through the beads highlighted in RED:
Step 19: Repeat Step 14 to Step 18 until your bracelet is the length you want it, minus about a third-inch and the length of your clasp:
Step 20: To attach the other end of your clasp, string a seed bead, a 3mm bead, two seed beads, a 3mm bead and a seed bead. Go around and across through the top hole of the top-most two-hole tile bead (highlighted in RED):
Step 21: Go back up through the seed bead, the 3mm bead and the seed bead highlighted in RED:
Step 22: String a seed bead. Go through your clasp and then back down through this same seed bead that you just strung. Continue down through the seed bead, the 3mm bead and seed bead highlighted in RED:
Step 23: Go back around through the beads highlighted in RED:
Step 24: Go back around through your clasp and the beads highlighted in RED:
Weave back around and go through your clasp one more time. Use your extra tail thread to go back through the beads along the outer edge of both sides of your band. Knot in several places and then cut your thread.
For more color and bead combinations, click on the photo below to visit the RedPandaBeads.com Gallery of Color Suggestions!
|