|


|
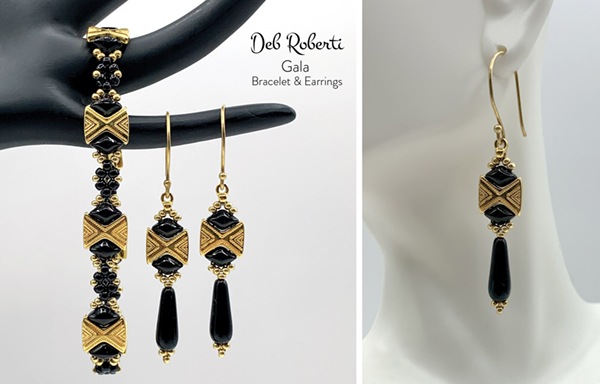
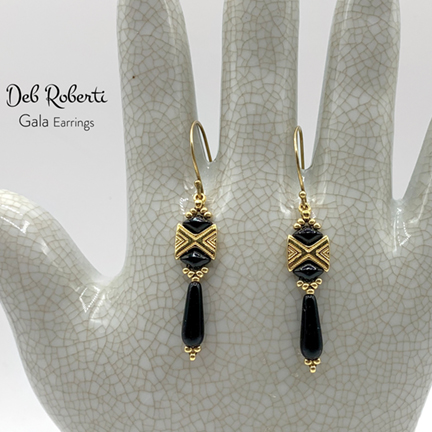
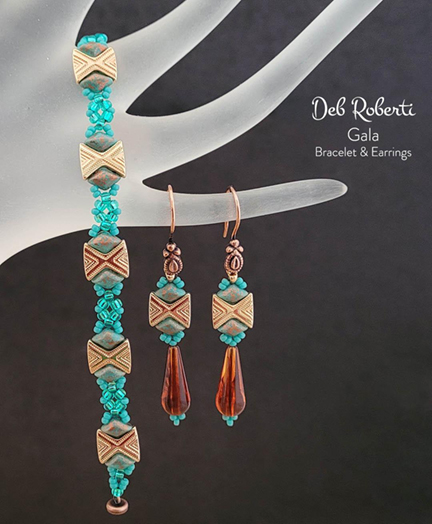
GALA BRACELET & EARRINGS (©2022 Deborah Roberti)
Quick and easy bracelet and matching earring pattern that features Beadsmith’s gorgeous Sostis Cymbal Bead Connector Elements. MATERIALS Earrings
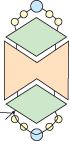
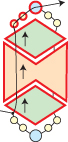
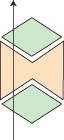
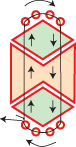
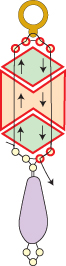
Step 1: Thread your needle with a length of FireLine that you feel comfortable working with and add more as you need it. Leaving about a 10-inch tail for attaching your clasp, hold onto this tail thread and go through the left hole of a GemDuo bead, a Sostis Cymbal and another GemDuo bead:
NOTE: You will not be making a knot until Step 3 so keep the tension tight and hold onto this tail thread for now. Step 2: String two 11/0 seed beads, an 8/0 seed bead and two more 11/0 seed beads. Go around and down through the right hole of the GemDuo bead, the Sostis Cymbal and the GemDuo bead that you just added:
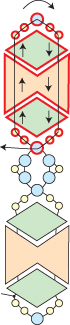
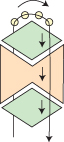
Step 4: Go all the way back around through the beads and Sostis Cymbal that you added in the first three steps (highlighted in RED):
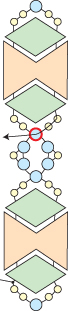
Step 5: Go back up through the left hole of the GemDuo bead, Sostis Cymbal and GemDuo bead (highlighted in RED). Continue up through the two 11/0 seed beads and the 8/0 seed bead (highlighted in RED) so that you are exiting from the topmost 8/0 seed bead:
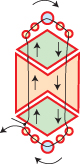
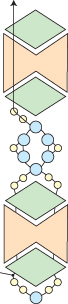
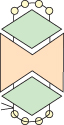
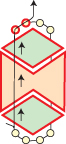
Step 6: String five 8/0 seed beads. Go around and back across through the 8/0 seed bead that you just exited (highlighted in RED):
Step 9: String an 11/0 seed bead. Go back around through the three 8/0 seed beads highlighted in RED:
Step 10: String an 11/0 seed bead. Go back up through the two 8/0 seed beads above (highlighted in RED):
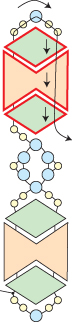
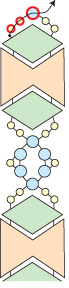
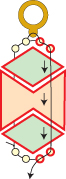
Step 11: To add the next motif, string two 11/0 seed beads. Add a GemDuo bead, a Sostis Cymbal and another GemDuo bead by going up through the left hole of each bead:
Step 12: String two 11/0 seed beads, an 8/0 seed bead and two more 11/0 seed beads. Go around and down through the right hole of the GemDuo bead, the Sostis Cymbal and the GemDuo bead that you just added (highlighted in RED):
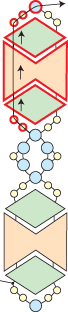
Step 14: Go all the way back around through the beads and Sostis Cymbal that you added in the last three steps (highlighted in RED):
Step 15: Go back up through the two 11/0 seed beads, the GemDuo bead, the Sostis Cymbal, the GemDuo bead, the two 11/0 seed beads and the 8/0 seed bead above (highlighted in RED) so that you are exiting from the topmost 8/0 seed bead:
Step 16: Repeat Step 6 to Step 15 until your bracelet is the length you want it, minus the length of your clasp and about a third-inch. Note: You can add more beads when you attach the clasp to make your bracelet longer.
Step 17: To attach your clasp, string two 11/0 seed beads and an 8/0 seed bead. Go through your clasp and back down through the 8/0 seed bead that you just strung:
NOTE: To make your bracelet longer, just add more seed beads than directed in this step and the next. Step 18: String two more 11/0 seed beads. Go back across through the 8/0 seed bead that you exited earlier (highlighted in RED):
Step 19: Go back around through the beads highlighted in RED and the clasp several times:
Weave into the bracelet, knot in several places and then cut your thread. Step 20: To attach the clasp to the other end of your bracelet, thread your needle with the tail thread from Step 1. Go up through the two 11/0 seed beads and 8/0 seed bead highlighted in RED:
Repeat Steps 17-19. Gala Earrings
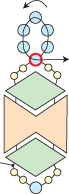
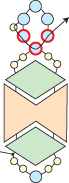
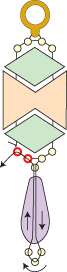
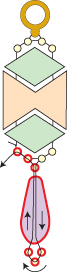
Step 1: Thread your needle with about two feet of FireLine. Leaving about a 6-inch tail that you can cut and weave in later, hold onto this tail thread and go through the left hole of a GemDuo bead, a Sostis Cymbal and another GemDuo bead:
NOTE: You will not be making a knot until Step 3 so keep the tension tight and hold onto this tail thread for now. Step 2: String four 11/0 seed beads. Go around and down through the right hole of the GemDuo bead, the Sostis Cymbal and the GemDuo bead that you just added:
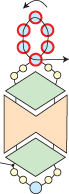
Step 4: Go all the way back around through the beads and Sostis Cymbal that you added in the first three steps (highlighted in RED):
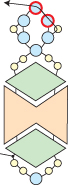
Step 5: Go back up through the left hole of the GemDuo bead, the Sostis Cymbal and the GemDuo bead (highlighted in RED). Continue up through the two 11/0 seed beads (highlighted in RED):
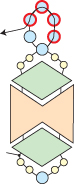
Step 6: Go through the bottom hole of a Remata Cymbal. Go back down through the two 11/0 seed beads, the GemDuo, the Sostis Cymbal, the GemDuo and the two 11/0 seed beads below (highlighted in RED):
Step 7: String an 11/0 seed bead, a drop bead and three more 11/0 seed beads. Go around and back up through the drop bead and the 11/0 seed bead above so that the three 11/0 seed beads form a seed bead picot below the drop bead. Continue up through the two 11/0 seed beads highlighted in RED:
Step 8: Go back around through the beads highlighted in RED and the Remata Cymbal element:
Step 9: Go back around through the beads highlighted in RED:
Weave back into the earring, knot and cut your thread. Attach your earring finding to the Remata Cymbal element.
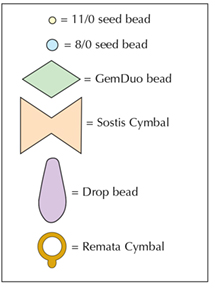
Beads used in the photo above
Bracelet
For more color and bead combinations, click on the photo below to visit the RedPandaBeads.com Gallery of Color Suggestions!
|