|
| Anniversary Sale! 22% off all patterns! |


|
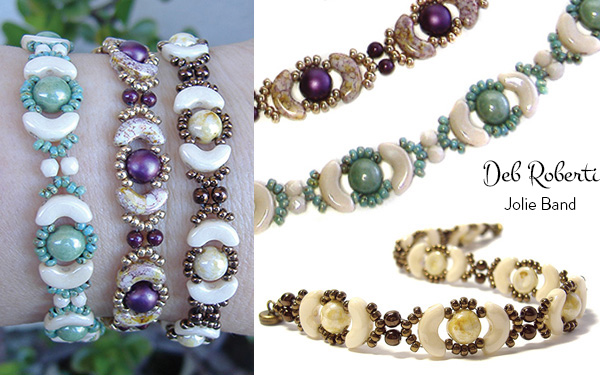
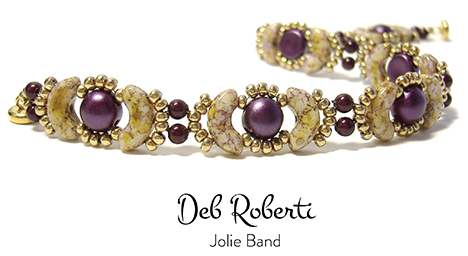
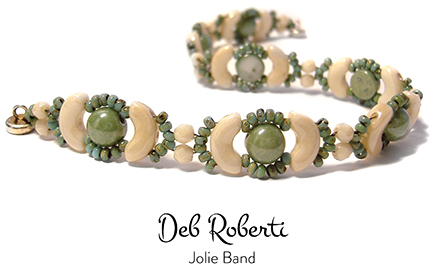
JOLIE BAND (©2016 Deborah Roberti)
Arcos beads (officially called Arcos® Par Puca® by the company that created and manufactures them—French jewelry designer, Les Perles par Puca®) are crescent-shaped beads with three holes that go through the flat side of the bead. They measure 5x10mm with a thickness of about 3mm and come in many lovely colors. Links to exact beads used at the end of the page. MATERIALS
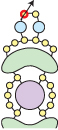
Step 1: Thread your needle with about 2 yards of FireLine (or start with a length that you feel comfortable with and add more later). Leaving about an 8-inch tail for attaching the clasp, string a 3mm bead, two seed beads, a 3mm bead and two seed beads. Tie the beads in a circle with a tight double knot:
Step 2: Go back around through the beads that you strung in the first step, grab your tail thread and tie another tight knot:
Step 3: Go back up through the 3mm bead and the two seed beads highlighted in RED:
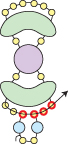
NOTE: Although Arcos beads have three holes, you’ll only be using the two outside holes for this design. Just ignore the middle hole. Step 4: String two seed beads. Go up through the right hole of an Arcos bead:
Step 5: String a seed bead and go up through the right hole of a two-hole Cabochon bead.
Step 6: String six seed beads. Go around the top of the Arcos bead that you just exited (highlighted in RED) and then down through the left hole of this same Arcos bead:
Step 7: String a seed bead. Go down through the left hole of the two-hole Cabochon bead highlighted in RED:
Step 8: String a seed bead. Go down through the left hole of the Arcos bead highlighted in RED:
Step 9: String two seed beads. Go across through the four seed beads highlighted in RED:
Step 10: Go back up through the right hole of the bottom Arcos bead, the seed bead above, the right hole of the two-hole Cabochon bead, the seed bead above and the right hole of the top Arcos bead highlighted in RED:
Step 11: Go back around and down through the six seed beads, the left hole of the Arcos bead and the seed bead highlighted in RED:
Step 12: String three seed beads. Go around the two-hole Cabochon bead and then down through the seed bead, the left hole of the Arcos bead and the six seed beads highlighted in RED:
NOTE: Unfortunately, not all size 11/0 seed beads are actually the same size. If three seed beads doesn’t seem like enough to wrap around the two-hole Cabochon in this step and Step 14, just add four seed beads. Step 13: Go up through the right hole of the Arcos bead and the seed bead highlighted in RED:
Step 14: String three seed beads. Go around the two-hole Cabochon bead and then up through the seed bead, the right hole of the Arcos bead and the four seed beads highlighted in RED:
OPTIONAL: If you want to add some more strength to your band, go back around through the beads highlighted in RED:
Step 15: String a 3mm bead, two seed beads and a 3mm bead. Go around and back across through the two seed beads highlighted in RED:
Step 16: Go back around through the beads that you added in the last step (highlighted in RED):
Step 17: Go back up through the 3mm bead and the two seed beads highlighted in RED:
Step 18: Repeat Step 4 to Step 17 until your bracelet is the length you want it, minus about a quarter-inch and the length of your clasp:
Step 19: To add your clasp, go back around through the beads highlighted in RED:
Step 20: String a seed bead. Go through your clasp and then back down through the seed bead that you just strung:
OPTIONAL: If you want to make your bracelet longer, add a seed bead, a 3mm bead and a seed bead instead of a single seed bead. Go through your clasp and then back down through the beads that you just strung:
Step 21: Go back around through the beads highlighted in RED:
Step 22: Go back around through the beads highlighted in RED and the clasp several times:
Weave back into the bracelet, knot in several places and then cut your thread. Step 23: To attach the clasp to the other end of your bracelet, thread your needle with the tail thread from Step 1. Go up through the seed bead highlighted in RED:
Repeat Steps 20-22.
Beads used in the photo above
Purple/Gold version:
Green Turquoise/Cream version:
Bronze/Cream version: Matching Jolie Earrings pattern available by clicking on the photo below:
Click HERE to go to the RedPandaBeads.com Gallery of Color Suggestions to see some of Betsy Ramsey's fabulous colorways!
|