|
LINDA'S TWEAKED JEWELED BRACELET
(©2013 Deborah Roberti, Linda Genaw)

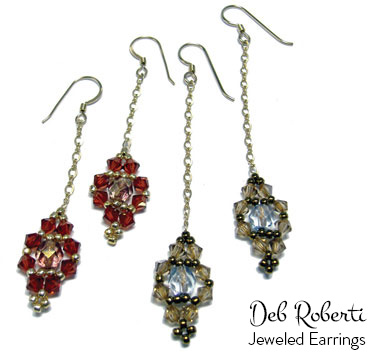
My free Jeweled Earrings pattern
(https://www.aroundthebeadingtable.com/Tutorials/JeweledEarrings.html)
adapted into a beautiful bracelet by Linda Genaw
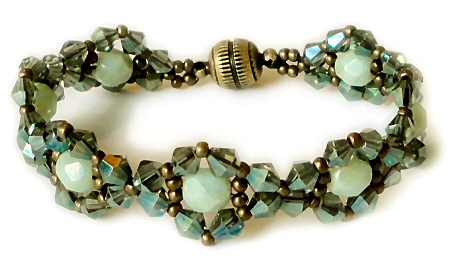
Materials (for a 7.5 inch bracelet):
- 4 yards FireLine
- About 100 size 11/0 seed beads
- About 72 size 4mm bicone crystals
- About 9 size 6mm fire-polished beads
- clasp
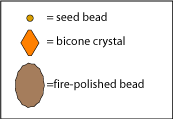
Step 1: Thread your needle with 4 yards of Fireline (or start with a length that you are comfortable with and add more later).
String two seed beads, a fire-polished bead, two seed beads, a bicone crystal, a seed bead and a bicone crystal.
Leaving about a 12-inch tail for attaching the clasp, tie the beads in a circle with a double knot:

Step 2: Go back around through the two seed beads and the fire-polished bead that you strung in the last step:

Step 3: String two seed beads, a bicone crystal, a seed bead, a bicone crystal and two seed beads.
Go around and back across through the fire-polished bead:
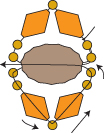
Step 4: Go back up and around through the two seed beads, the bicone crystal, the seed bead, the bicone crystal and the seed bead highlighted in RED:

Step 5: String a bicone crystal, a seed bead and a bicone crystal.
Go back across through the seed bead, the bicone crystal, the seed bead, the bicone crystal and the seed bead (all beads highlighted in RED):
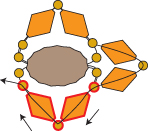
Step 6: String a bicone crystal, a seed bead and a bicone crystal.
Go back across through the seed bead, the bicone crystal, the seed bead, the bicone crystal, the seed bead, the bicone crystal and the seed bead highlighted in RED:
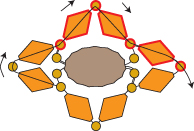
Step 7: String a bicone crystal, a seed bead, a bicone crystal, a seed bead, a bicone crystal, two seed beads, a fire-polished bead and a seed bead:

Step 8: Circle back around...
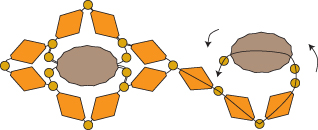
and go down through the seed bead, the bicone crystal and the seed bead highlighted in RED):
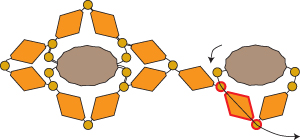
Step 9: Continue back around through the bicone crystal the two seed beads and the fire-polished bead highlighted in RED:
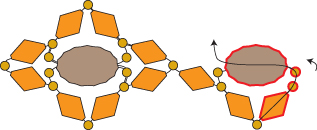
Step 10: String two seed beads, a bicone crystal, a seed bead, a bicone crystal and two seed beads. Go around and back across through the fire-polished bead:

Step 11: Go back down and around through the two seed beads, the bicone crystal, the seed bead, the bicone crystal and the seed bead highlighted in RED:
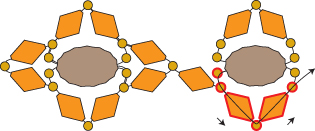
Step 12: String a bicone crystal, a seed bead and a bicone crystal. Go around and back across through the seed bead, the bicone crystal, the seed bead, the bicone crystal and the seed bead highlighted in RED:
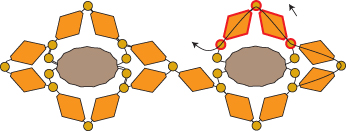
Step 13: String a bicone crystal. Go back around through the seed bead, the bicone crystal, the seed bead, the bicone crystal, the seed bead, the bicone crystal, the seed bead, the bicone crystal and the seed bead highlighted in RED:
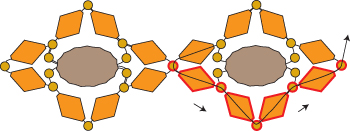
Step 14: Go back around through the beads highlighted in RED to give the motif some extra strength:
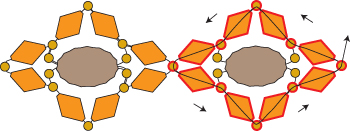
Step 15: Flip the bracelet over so that you are exiting from the bottom of the right-most seed bead:
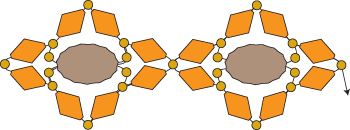
Step 16: Repeat Step 7 to Step 15 until your bracelet is the length you want it, minus about a half-inch and the length of your clasp.

Step 17: To attach one side of your clasp, make a loop of seed beads that will circle round through your clasp: String two seed beads, go through your clasp, string two more seed beads and go back down through the seed bead that you exited at the beginning of this step:
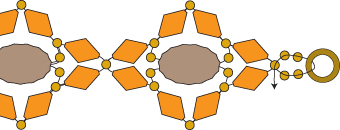
Go back around through these seed beads and the clasp several times. Weave back through the bracelet, going around through the outside of each motif to strengthen and tighten up the beads. Knot in several places and cut your thread. Use the tail thread from Step 1 to attach the other side of the clasp.
Many thanks, Linda!

This bracelet matches my free Jeweled Earrings pattern:
|

