|
| Anniversary Sale! 22% off all patterns! |


|
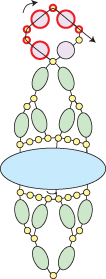
SOFIA BRACELET (©2026 Deborah Roberti)
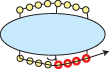
Sofia is a simple but lovely bracelet pattern designed for the 3-hole Athos® par Puca® cabochons from Les Perles par Puca. Perfect as a focal bead, the Athos 3-hole oval cabochons measure 20x10mm, have domed front sides, flat backs, three parallel holes and come in some gorgeous colors and coatings. This design uses the 3-hole Athos cabochon but a variation without holes that can be bezeled is also available. It will not, however, work with this pattern so make sure that you have the 3-hole Athos cabochon version. I got my Athos par Puca 3-hole cabochon beads from QueenCityBead.com—click HERE! Beads used in the photo above listed at the bottom of the pattern page. MATERIALS
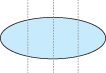
You will be starting in the middle of the bracelet so thread your needle with a length of FireLine that you feel comfortable working with but leave a long tail (I left a tail of about four feet) that you will pick up and thread your needle with in Step 31 to begin the other side of your bracelet. NOTE: 3-hole Athos cabochon bead holes run parallel through the bead and you will use each hole in the steps that follow.
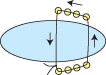
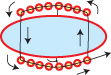
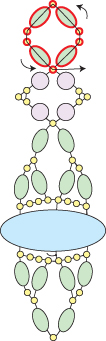
Step 1: Leaving about four feet of tail thread that you will use in Step 31, string four seed beads and go up through the right-most hole of the Athos bead. String four more seed beads and go down through the middle hole of the Athos bead. Grab your tail thread and tie a very tight double knot:
Step 2: Go back across through the bottom four seed beads, up through the right-most hole of the Athos bead and across through the top four seed beads highlighted in RED:
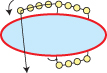
Step 3: String four seed beads Go down through the left-most hole of the Athos bead (highlighted in RED):
Step 4: String four seed beads. Go across through the four seed beads under the Athos bead (highlighted in RED):
Step 5: Circle back around through the seed beads and Athos bead highlighted in RED. Pull tight so that the seed beads are nice and snug against the Athos bead:
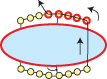
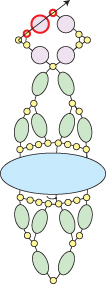
Step 6: Go up through the right-most hole of the Athos bead and across through the top five seed beads (highlighted in RED):
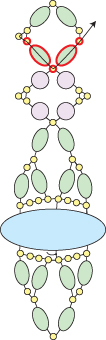
Step 7: String a fire-polished bead, a seed bead, a fire-polished bead, a seed bead, a fire-polished bead, a seed bead and a fire-polished bead. Go around and back across through the seed bead that you just exited (highlighted in RED):
Step 8: Go across through the next three seed beads above the Athos bead, down through the left-most hole of the Athos bead and across through the bottom five seed beads (all highlighted in RED):
Step 9: String a fire-polished bead, a seed bead, a fire-polished bead, a seed bead, a fire-polished bead, a seed bead and a fire-polished bead. Go around and back across through the seed bead that you just exited (highlighted in RED):
Step 10: Go across through the bottom three seed beads, up through the right-most hole in the Athos bead and through the seed bead above (all beads highlighted in RED):
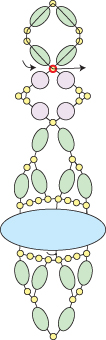
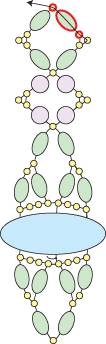
Step 11: String a fire-polished bead and a seed bead. Go up and around through the seed bead, the fire-polished bead, the seed bead, the fire-polished bead and the seed bead above (highlighted in RED):
Step 12: String a seed bead and a fire-polished bead. Go down through the seed bead, the left-most hole of the Athos bead and the seed bead below (highlighted in RED):
Step 13: String a fire-polished bead and a seed bead. Go down and around through the seed bead, the fire-polished bead, the seed bead, the fire-polished bead and the seed bead below (highlighted in RED):
Step 14: String a seed bead and a fire-polished bead. Go up through the seed bead, the right-most hole of the Athos bead, the seed bead, the fire-polished bead, the two seed beads, the fire-polished bead and the seed bead highlighted in RED:
Step 15: Go back around through the beads highlighted in RED:
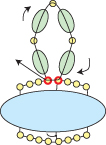
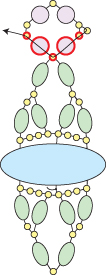
You’ve just finished the center motif. Next you will bead the side straps. Step 16: String a round bead, two seed beads, a round bead, a seed bead, a round bead, two seed beads and a round bead. Go around and back through the seed bead that you just exited (highlighted in RED):
Step 17: Go back around through the beads that you just added (highlighted in RED):
Step 18: Go back around through the beads highlighted in RED:
Step 19: String a seed bead. Go around through the seed bead, the round bead, the seed bead, the round bead and the seed bead highlighted in RED. The seed bead that you just added should sit beside the two adjacent seed beads so that the trio of seed beads form a nice point as you pull tight:
Step 20: String another seed bead. Go up through the seed bead, the round bead and the seed bead highlighted in RED. Again, the seed bead that you just added should sit beside the two adjacent seed beads so that the trio of seed beads form a nice point as you pull tight:
Step 21: String a fire-polished bead, two seed beads, a fire-polished bead, a seed bead, a fire-polished bead, two seed beads and a fire-polished bead. Go around and back through the seed bead that you just exited (highlighted in RED):
Step 22: Go back around through the beads that you just added (highlighted in RED):
Step 23: Go back around through the beads highlighted in RED:
Step 24: String a seed bead. Go around through the seed bead, the fire-polished bead, the seed bead, the fire-polished bead and the seed bead highlighted in RED. The seed bead that you just added should sit beside the two adjacent seed beads so that the trio of seed beads form a nice point as you pull tight:
Step 25: String another seed bead. Go up through the seed bead, the fire-polished bead and the seed bead highlighted in RED. Again, the seed bead that you just added should sit beside the two adjacent seed beads so that the trio of seed beads form a nice point as you pull tight:
Step 26: Flip the bracelet over horizontally so that you are exiting from the right side of the top seed bead and can continue to follow the directions as written:
Step 27: Repeat Step 21 to Step 26, alternating between round beads and fire-polished beads, until this half of your bracelet is the length you want it, minus about a quarter-inch and the length of your clasp end:
Next, you will complete the other side of your bracelet. Step 28: To attach one end of your clasp, string three seed beads. Go through your clasp and back down through the last seed bead that you just added:
NOTE: If you want to make your bracelet longer, just add more beads, or larger beads, in this step and the next. Step 29: String two more seed beads. Go back across through the seed bead at the end of the bracelet (highlighted in RED):
Step 30: Go back around through the seed beads highlighted in RED and your clasp several times:
Weave back into the bracelet, knot in several places and cut your FireLine. Step 31: To finish the other side of the bracelet, thread your needle with the long tail from Step 1 (or add more FireLine). Go up through the beads highlighted in RED:
Step 32: Repeat Step 16 to 30:
Beads used in my photos NOTE: Bead colors and coatings (and even bead types!) seem to be disappearing at a rate that I can no longer keep up with. I try to find substitutes when I can but "discontinued" and "out of stock" seems to be the norm these days.
Picasso version:
Jet AB version:
• About 150 size 11/0 Miyuki (rocaille) seed beads: Duracoat Galvanized Gold • About 36 size 4mm fire-polished beads: Crystal Apricot Metallic Ice • About 32 size 4mm round beads: Alabaster Metallic Lilac • One 3-hole Athos® par Puca® glass bead: Mix Violet/Gold
|