|


|
WIBEDUO TILE BRACELET & EARRINGS (©2020 Deborah Roberti)
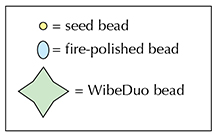
Create this pretty bracelet and matching earrings using size 11/0 Miyuki rocaille seed beads, 3mm fire-polished beads and Czech WibeDuo beads—8mm star-shaped beads with two parallel holes, a “pillowed” front side and a flat back side. Links to exact beads used at the end of the page. MATERIALS: Bracelet MATERIALS: Earrings
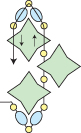
Step 1: Thread your needle with a length of FireLine that you feel comfortable working with and add more as you need it. Leaving about a ten-inch tail for attaching one end of your clasp, string a seed bead, a fire-polished bead, a seed bead, a fire-polished bead and a seed bead. Go up through the right hole of a WibeDuo bead:
NOTE: Position the WibeDuo beads the way they appear in my illustrations. The two holes should run parallel to one another on the left and right side and the rounded “front” side should face toward you except where noted:
In addition, you will not be making a knot until Step 4 so hold onto this tail thread for now. Step 2: String a seed bead, go up through the left hole of a second WibeDuo bead and string another seed bead:
Step 3: Go through the right hole of a third WibeDuo bead. String a seed bead, a fire-polished bead, a seed bead, a fire-polished bead and a seed bead. Go around and down through the left hole of the WibeDuo bead that you just added:
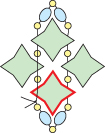
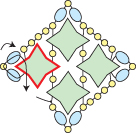
Step 4: String a seed bead and go down through the right hole of a fourth WibeDuo bead. String a seed bead and go down through the left hole of the first WibeDuo bead that you added in Step 1 (highlighted in RED). Grab your tail thread and tie a tight double knot:
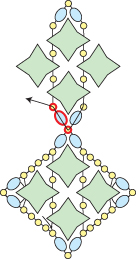
Step 5: Go back around through the seed bead, the fire-polished bead, the seed bead, the fire-polished bead and the seed bead highlighted in RED:
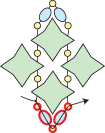
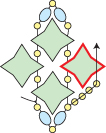
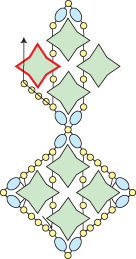
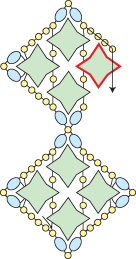
Step 6: String four seed beads. Go up through the right hole of the WibeDuo bead above (highlighted in RED):
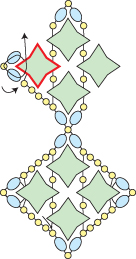
Step 7: String a fire-polished bead, a seed bead and a fire-polished bead. Go around and back up through the right hole of the WibeDuo bead that you just exited (highlighted in RED):
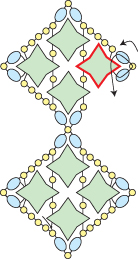
Step 8: String four seed beads. Go around through the seed bead, the fire-polished bead, the seed bead, the fire-polished bead and the seed bead above (highlighted in RED):
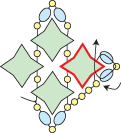
Step 9: String four seed beads. Go down through the left hole of the WibeDuo bead below (highlighted in RED):
Step 10: String a fire-polished bead, a seed bead and a fire-polished bead. Go around and back down through the left hole of the WibeDuo bead that you just exited (highlighted in RED):
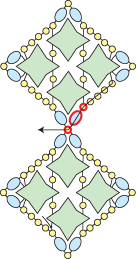
Step 11: String four seed beads. Go around through the seed bead, the fire-polished bead and the seed bead below (highlighted in RED):
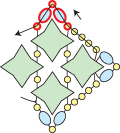
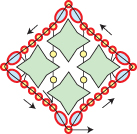
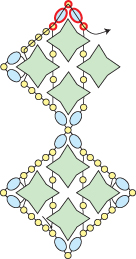
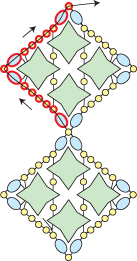
Step 12: Go back around through the seed beads and fire-polished beads that surround the four WibeDuo beads (highlighted in RED):
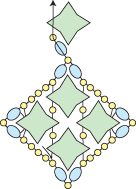
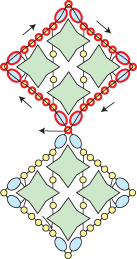
Step 13: Go back around through the seed beads and fire-polished beads highlighted in RED to exit out of the top seed bead and finish the first motif for your bracelet:
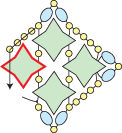
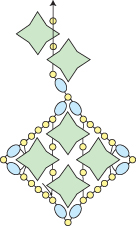
Step 14: To start the next motif, string a fire-polished bead and a seed bead. Go up through the left hole of a new WibeDuo bead:
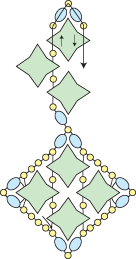
Step 15: String a seed bead, go up through the right hole of another new WibeDuo bead and string another seed bead:
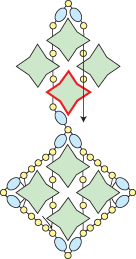
Step 16: Go through the left hole of a third new WibeDuo bead. String a seed bead, a fire-polished bead, a seed bead, a fire-polished bead and a seed bead. Go around and down through the right hole of the WibeDuo bead that you just added:
Step 17: String a seed bead and go down through the left hole of a fourth new WibeDuo bead. String a seed bead and go down through the right hole of the WibeDuo bead that you added in Step 14 (highlighted in RED):
Step 18: String a seed bead and a fire-polished bead. Go back around through the seed bead, the fire-polished bead and the seed bead highlighted in RED:
Step 19: String four seed beads. Go up through the left hole of the WibeDuo bead above (highlighted in RED):
Step 20: String a fire-polished bead, a seed bead and a fire-polished bead. Go around and back up through the left hole of the WibeDuo bead that you just exited (highlighted in RED):
Step 21: String four seed beads. Go around through the seed bead, the fire-polished bead, the seed bead, the fire-polished bead and the seed bead above (highlighted in RED):
Step 22: String four seed beads. Go down through the right hole of the WibeDuo bead below (highlighted in RED):
Step 23: String a fire-polished bead, a seed bead and a fire-polished bead. Go around and back down through the right hole of the WibeDuo bead that you just exited (highlighted in RED):
Step 24: String four seed beads. Go around through the seed bead, the fire-polished bead and the seed bead below (highlighted in RED):
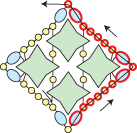
Step 25: Go back around through the seed beads and fire-polished beads that surround the four WibeDuo beads (highlighted in RED):
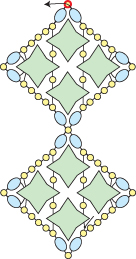
Step 26: Go back around through the seed beads and fire-polished beads highlighted in RED to exit out of the top seed bead and finish the second motif for your bracelet:
Step 27: Flip the bracelet over horizontally so that you are exiting from the left side of the top-most seed bead instead of the right side and can repeat Steps 14-27 as illustrated (see next step), keeping in mind that sometimes you will add WibeDuo beads with the rounded side facing you and at other times with the flat side facing you:
Step 28: Repeat Step 14 to Step 27 to add more motifs until your bracelet is the length you want it, minus the length of your clasp and about a third-inch:
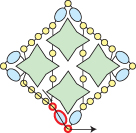
Step 29: To attach your clasp, string three seed beads. Go through your clasp and then back through the last seed bead that you just strung:
NOTE: To make your bracelet longer, just add more beads—or larger beads like 3mm fire-polished beads—than directed in this step and the next. Step 30: String two more seed beads. Go back across through the seed bead highlighted in RED:
Step 31: Go back around through the seed beads highlighted in RED and the clasp several times to reinforce your attachment to the clasp:
Weave back into your bracelet, knot in several places and cut your thread. Step 32: To attach the clasp to the other end of your bracelet, thread your needle with the tail thread from Step 1. Go around through the beads highlighted in RED:
Repeat Steps 29-31. WibeDuo Tile Earrings
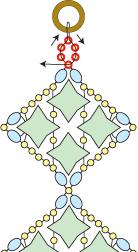
Repeat Steps 1-13 of the WibeDuo Bracelet but start with only two feet of FireLine and leave a 6-inch tail that you can weave in and cut at any time:
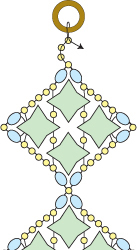
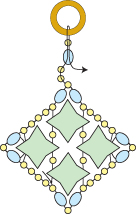
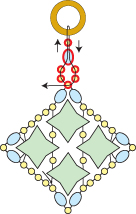
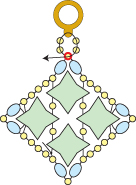
In the steps that follow, I have included three different ways to connect your earring motif to your earring finding. Pick the one you like best. Closed Jump Ring Step 14: To add a closed jump ring, string two seed beads, a fire-polished bead and another seed bead. Go through the jump ring and then go back down through the seed bead and fire-polished bead that you just strung:
Step 15: String two more seed beads. Go back across through the top seed bead on the motif (highlighted in RED):
Step 16: Go back around through the beads highlighted in RED and your jump ring:
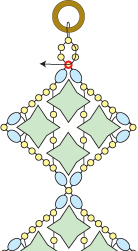
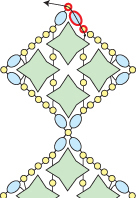
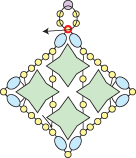
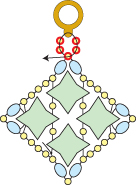
Weave back around through the outer edge of beads along the earring motif again, knot and cut your thread. Connect your earring to your earring finding. Open Jump Ring I love the way Linda Genaw of Linda’s Crafty Inspirations attaches her earring findings and this is a variation of her method. Step 14: String two 11/0 seed bead, an 8/0 seed bead and two more 11/0 seed beads. Go around and back across through the top 11/0 seed bead on the motif (highlighted in RED):
Step 15: Go back around through the beads that you just added (highlighted in RED):
Weave back around through the outer edge of beads along the earring motif again, knot and cut your thread. Step 16: Open and insert the jump ring through the 8/0 seed bead, close it and connect it to your earring finding:
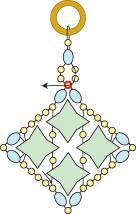
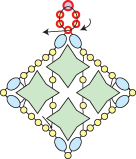
Cymbal Element Many of the Beadsmith Cymbal™ elements work wonderfully instead of jump rings. Step 14: String two seed beads. Go through a Cymbal element. String two more seed beads. Go around and back across through the top seed bead on the motif (highlighted in RED):
Step 15: Go back around through the beads highlighted in RED and the Cymbal element:
Weave back around through the outer edge of beads along the earring motif again, knot and cut your thread. Attach the Cymbal to your earring finding.
Beads used in my photos NOTE: Bead colors and coatings (and even bead types!) seem to be disappearing at a rate that I can no longer keep up with. I try to find substitutes when I can but "discontinued" and "out of stock" seems to be the norm these days.
Seafoam/Gold version
Ruby/Gold version
Purple/Gold version
For more color and bead combinations, click on the photo below to visit the RedPandaBeads.com Gallery of Color Suggestions!
|