|
| Anniversary Sale! 22% off all patterns! |


|
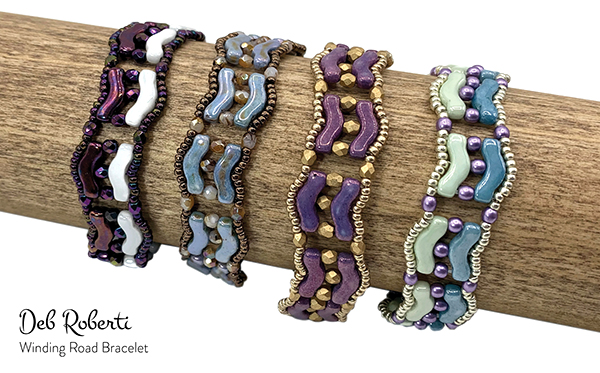
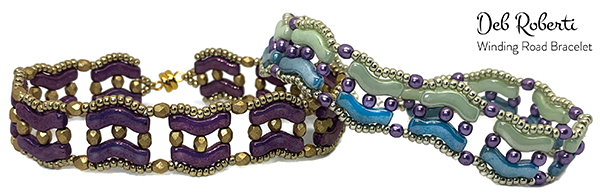
WINDING ROAD BRACELET (©2020 Deborah Roberti)
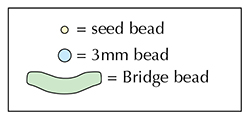
Bead up this simple band using Miyuki 11/0 rocaille seed beads, 3mm round or fire-polished beads and Bridge beads—three-hole 3x12mm Czech beads with a lovely curve. Links to beads used at the end of the page.
MATERIALS: Bracelet
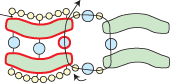
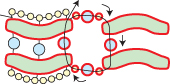
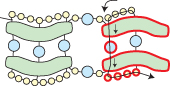
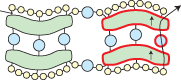
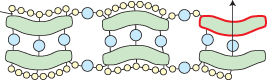
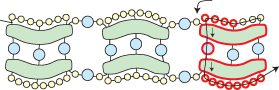
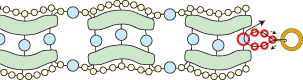
Step 1: Thread your needle with a length of FireLine that you feel comfortable working with and add more as you need it. Leaving a 12-inch tail for attaching your clasp, string a Bridge bead, a 3mm bead and a Bridge bead:
NOTE: You will not be making a knot until Step 4 so keep the tension tight and hold onto this tail thread for now. Also, make sure the Bridge beads are positioned the way they appear in my illustrations (crescent-side up or down) as you add them. Step 2: String four seed beads. Go around and up through the middle hole of the bottom Bridge bead that you just exited (highlighted in RED):
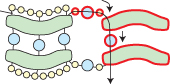
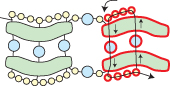
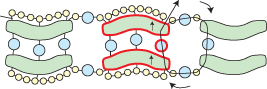
Step 4: String four seed beads. Grab your tail thread and tie a tight double knot:
Step 5: Go back down and around through the beads highlighted in RED so that you are once again exiting from the top left seed bead:
Step 6: Go back down and around through the Bridge beads, the 3mm bead and the seed beads highlighted in RED:
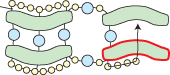
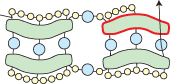
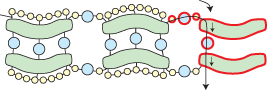
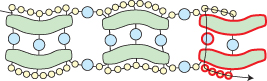
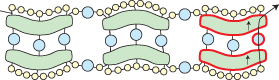
Step 7: String four seed beads. Go around and up through the right hole of the bottom Bridge bead (highlighted in RED):
Step 8: String a 3mm bead. Go up through the right hole of the top Bridge bead (highlighted in RED):
Step 9: String three seed beads. Go around through the beads highlighted in RED:
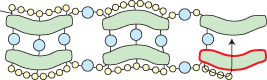
Step 10: Go back up through the beads highlighted in RED:
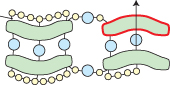
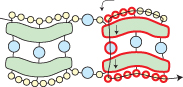
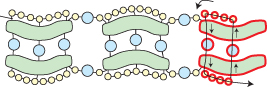
You just finished the first Winding Road “stack” of Bridge beads, 3mm beads and seed beads. Note that you will end up with eight seed beads along the crescent of the bottom Bridge bead and only seven along the top Bridge bead because there is less space in the dip of the Bridge bead than there is around the crescent edge. Next, you will add another “stack” but you will flip the Bridge beads so that the crescent side is facing up instead of down to create the “winding” effect. Step 11: String a seed bead, a 3mm bead, a seed bead, a Bridge bead, a 3mm bead, a Bridge bead, a seed bead, a 3mm bead and a seed bead. NOTE: Position the new Bridge beads so that the crescent is facing up like in the illustration below. Go around and up through the bottom Bridge bead, the 3mm bead and the top Bridge bead in the first “stack” (highlighted in RED):
Step 12: Circle back around through the beads highlighted in RED:
Step 14: String four seed beads. Go around and up through the middle hole of the bottom Bridge bead that you just exited (highlighted in RED):
Step 16: String four seed beads. Go around through the beads highlighted in RED:
Step 17: Go back around through the beads highlighted in RED. Keep the tension tight so that the seed beads align along the Bridge beads. Press the seed beads against the Bridge beads with your fingers if you need to:
Step 18: String three seed beads. Go up through the right hole of the bottom Bridge bead (highlighted in RED):
Step 19: String a 3mm bead. Go up through the right hole of the top Bridge bead (highlighted in RED):
Step 20: String four seed beads. Go around through the beads highlighted in RED:
Step 21: Go back up through the beads highlighted in RED:
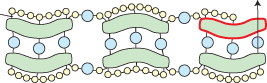
You just finished the second Winding Road “stack” of Bridge beads, 3mm beads and seed beads. Next, you will add another “stack” but again, you will flip the Bridge beads so that the crescent sides are facing downward in the new stack you will create. Step 22: String a seed bead, a 3mm bead, a seed bead, a Bridge bead, a 3mm bead, a Bridge bead, a seed bead, a 3mm bead and a seed bead. NOTE: Position the new Bridge beads so that the crescent is facing downward like in the illustration below. Go around and up through the bottom Bridge bead, the 3mm bead and the top Bridge bead in the adjacent “stack” (highlighted in RED):
Step 23: Circle back around through the beads highlighted in RED:
Step 25: String four seed beads. Go around and up through the middle hole of the bottom Bridge bead that you just exited (highlighted in RED):
Step 27: String four seed beads. Go around through the beads highlighted in RED:
Step 28: Go back around through the beads highlighted in RED, keeping your tension tight:
Step 29: String four seed beads. Go around and up through the right hole of the bottom Bridge bead (highlighted in RED):
Step 30: String a 3mm bead. Go up through the right hole of the top Bridge bead (highlighted in RED):
Step 31: String three seed beads. Go around through the beads highlighted in RED:
Step 32: Go back up through the beads highlighted in RED:
Step 33: Repeat Step 11 to Step 32, ending with a final repeat of Step 21 or 32, until your bracelet is the length you want it, minus the length of your clasp and about a quarter-inch for the beads used to connect your clasp, and minus an additional quarter-inch to account for shrinkage that will occur in the next step as you go back around through the beads along the outer edge:
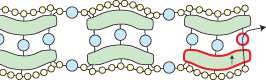
Step 34: To give your band some extra strength and smooth out the seed beads along the top and bottom edge of the bracelet, go back through the seed beads and 3mm beads highlighted in RED. As you pull tight, your bracelet will decrease in length about a quarter-inch, first on the top and then the bottom:
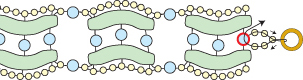
Step 35: To attach your clasp, go up through the right hole of the bottom Bridge bead and the 3mm bead highlighted in RED:
Step 36: String three seed beads. Go through your clasp and then back through the last seed bead that you just strung. String two more seed beads and go up through the 3mm bead that you exited at the end of the last step (highlighted in RED):
NOTE: To make your band longer, just add more seed beads than directed. Step 37: Go back around through the beads highlighted in RED and the clasp several times:
Weave into the band, knot in several places and then cut your thread. Step 38: To attach the clasp to the other end of your bracelet, thread your needle with the tail thread from Step 1. Go up through the right hole of the bottom Bridge bead and the 3mm bead highlighted in RED:
Repeat Steps 36-37.
Beads used in my photos NOTE: Bead colors and coatings (and even bead types!) seem to be disappearing at a rate that I can no longer keep up with. I try to find substitutes when I can but "discontinued" and "out of stock" seems to be the norm these days.
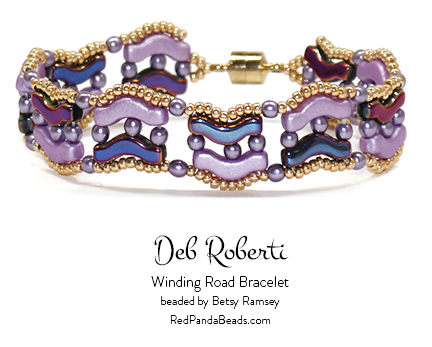
Chalk Lilac Vega Luster version:
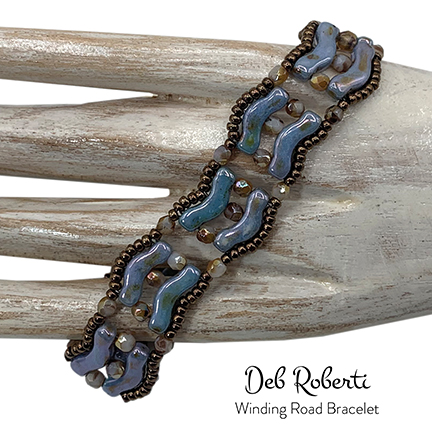
Chalk Lazure Blue version:
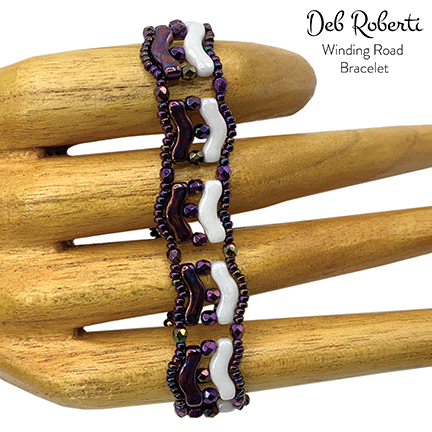
Jet Iris and Chalk White Shimmer version:
Blue and Chalk Green Luster version:
For more color and bead combinations, click on the photo below to visit the RedPandaBeads.com Gallery of Color Suggestions!
|